
Updated; August-2026
If you own a website and aren’t using Google Search Console (GSC), you’re effectively flying completely blind.
Analytics can show you how many people landed on your pages, but it won’t tell you how Google actually views your site, which exact keywords you’re floating around on page two for, or why that new post you published three days ago refuses to rank.
This isn’t another generic, high-level summary. At DGSoftHub, we stick to a simple rule: Learn. Implement. Grow Online. Below is the exact, unglamorous system I use to troubleshoot indexing issues, read performance data, and keep a WordPress site healthy in search.
If you’re still getting comfortable with core SEO concepts, start with our step-by-step guide to ranking on Google before diving into this guide.
Who Should Read This Guide?
This guide is designed for:
- WordPress website owners who want to improve their site’s visibility in Google Search
- Bloggers looking to increase organic traffic and understand search performance
- Affiliate marketers who want to monitor indexing, rankings, and content performance
- Small business owners managing their own website without hiring an SEO agency
- WooCommerce store owners who need to ensure product pages are properly indexed
- SEO beginners and growing website owners who are ready to move beyond the basics and use Google Search Console with confidence
If you’ve already verified your website in Google Search Console but aren’t sure how to interpret its reports, diagnose technical issues, or turn its data into actionable SEO improvements, this guide will provide a practical, step-by-step workflow to help you make informed decisions and improve your site’s long-term search performance.
Set up and verify Google Search Console
Submit and manage XML sitemaps
Diagnose indexing issues with URL Inspection
Fix common Page Indexing errors
Improve Core Web Vitals and page experience
Resolve common Search Console warnings
Optimize WordPress for better SEO
Understand manual actions and security reports
Combine Search Console with GA4 & PageSpeed
Follow a practical weekly SEO maintenance routine
Table of Contents
- What is Google Search Console?
- Why You Need It (Beyond Just Looking at Traffic)
- Setting Up GSC Without Breaking Anything
- Submitting Your Sitemap the Right Way
- The Dashboard: What Actually Matters
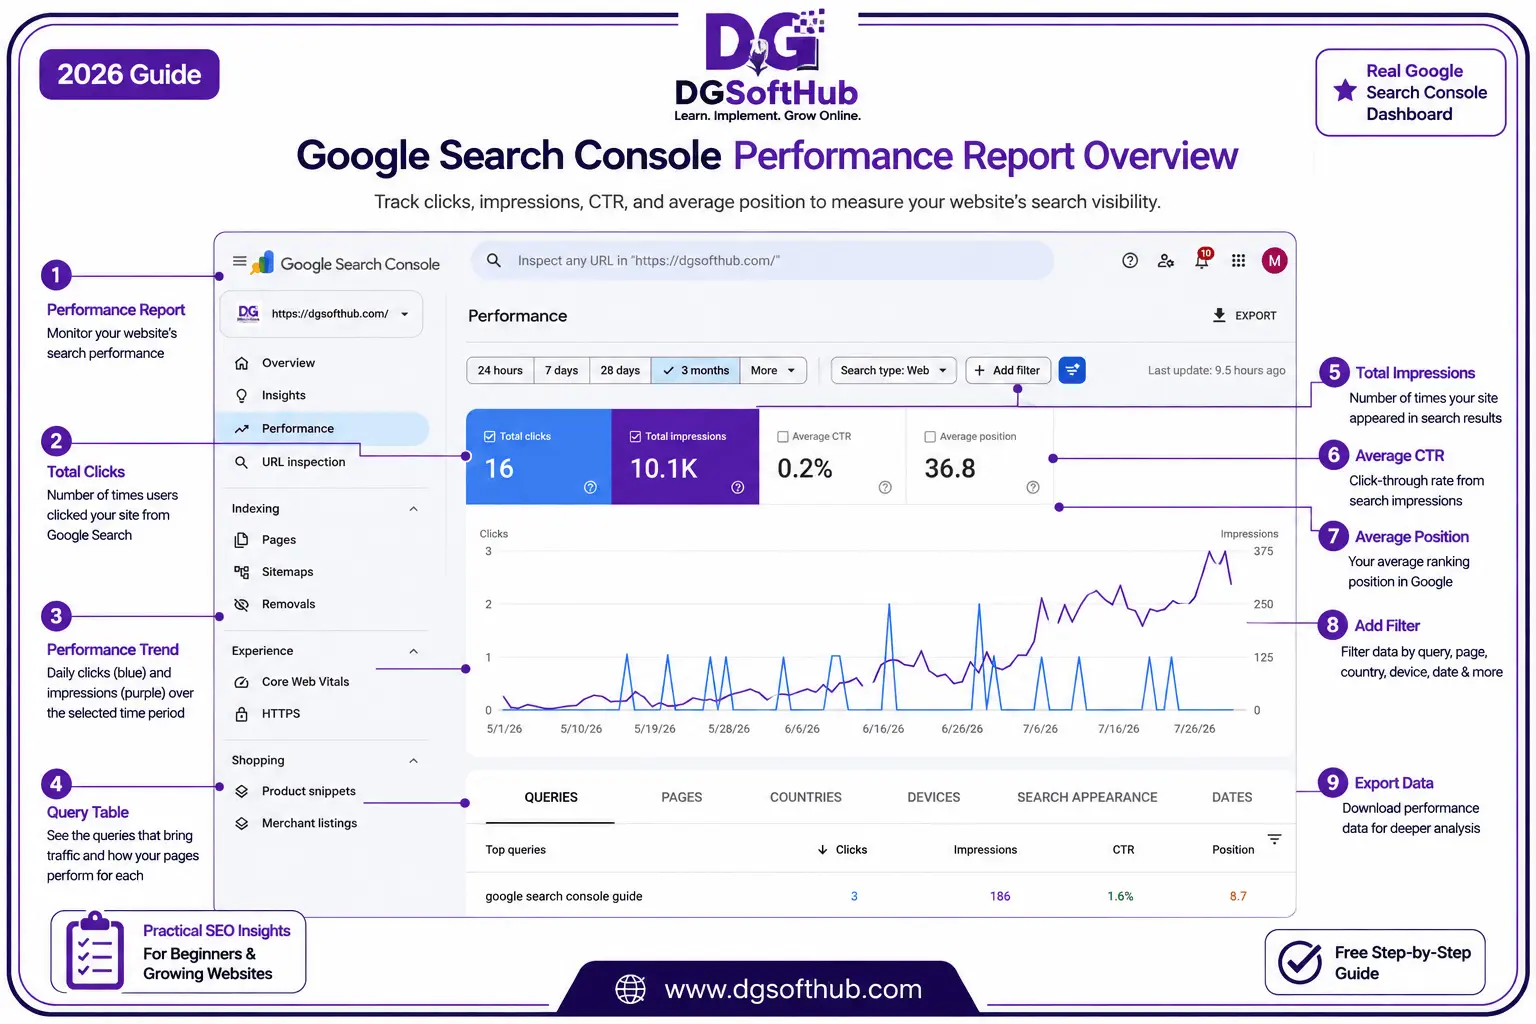
- How to Read the Performance Report
- The Page “2” Optimization Workflow
- Demystifying Indexing Reports (And When to Panic)
- Troubleshooting Checklists for Indexing Failures
- Core Web Vitals & Real-World Site Speed
- Security, HTTPS, and Links
- Connecting GSC to Your WordPress Stack
- Four Mistakes Most Beginners Make
- A Realistic Weekly & Monthly Routine
- Downloadable Resources: The Weekly GSC Maintenance Checklist
- Frequently Asked Questions (20 Detailed Answers)
- Your Final Action Plan
What is Google Search Console?
Google Search Console is a free suite of diagnostic tools provided directly by Google. It’s essentially a direct reporting system between your web server and Google’s search crawlers (Googlebot). According to Google’s official Search Console documentation, it enables website owners to understand how Google discovers, crawls, indexes, and evaluates their content..
Official Google Reference:
- Google Search Console Help – About Search Console
If you are new to web publishing, it helps to understand where GSC sits in your software stack. It doesn’t run code on your visitor’s browser, nor does it slow down your site like an analytics script might. Instead, it reads Google’s internal index logs and reports back what Googlebot experienced when it attempted to request, render, and index your pages.
The Critical Difference: Search Console vs. Google Analytics 4 (GA4)
The easiest way to separate GSC from Google Analytics is by looking at the moment of the click:
- Google Search Console tracks everything that happens before a user lands on your site. It records queries, impression counts, average position on Google’s Search Engine Results Pages (SERPs), and technical crawl errors.
- Google Analytics 4 tracks what happens after a user arrives on your site. It measures session durations, scroll depth, bounce behavior, user locations, and conversion events.
Before exploring each report in detail, it’s helpful to understand the overall layout of Google Search Console. The Overview dashboard serves as your central control panel, providing quick access to search performance, indexing status, Core Web Vitals, security reports, and other essential SEO insights. From this single screen, you can identify issues, monitor your website’s health, and navigate to the reports needed for deeper analysis.
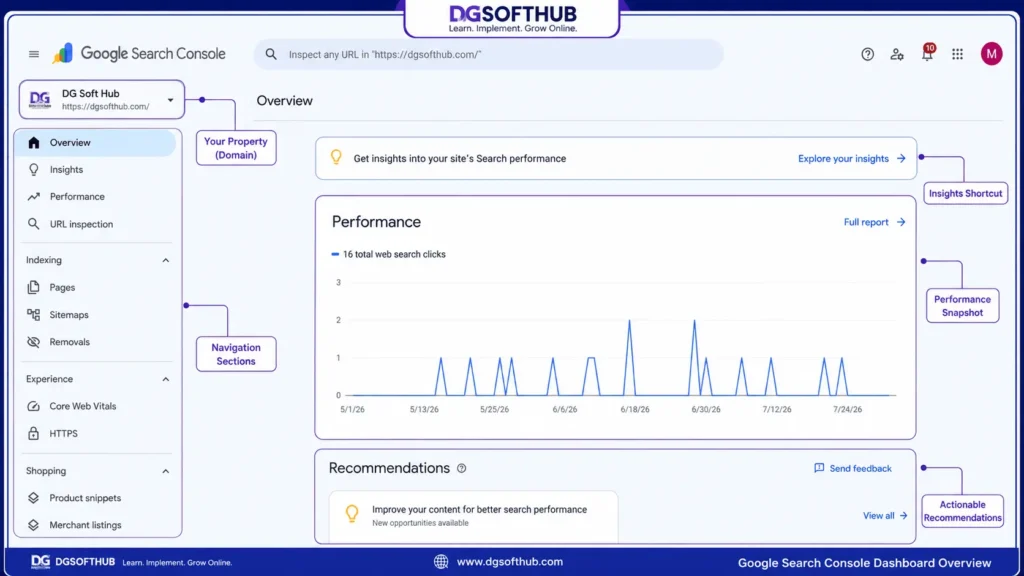
DGSoftHub Insight: The Overview dashboard should be your starting point whenever you log in to Google Search Console. A quick review of this page can help you spot indexing issues, performance changes, or technical warnings before they affect your website’s visibility in Google Search.
Official Google Reference: As noted in Google’s Search Central Documentation, Googlebot undergoes three primary phases: Crawling, Indexing, and Serving. Google Search Console is the primary window site owners have to monitor all three stages in real-time.
If your site suddenly drops off Google’s radar, GA4 will show you a terrifying traffic cliff, but it won’t give you a single clue why it happened. Search Console, on the other hand, will point directly to the culprit—whether it’s a server 5xx response code, a rogue noindex tag, or a DNS failure.
Why You Need It (Beyond Just Looking at Traffic)
When people first launch a blog or a digital product storefront, they usually spend all their time staring at traffic counters. But monitoring pageviews without checking GSC is like driving a car with your eyes glued to the speedometer while ignoring the engine light on the dashboard.
Setting up GSC gives you four immediate operational advantages:
Instant Index Diagnostics
You don’t have to guess whether Google knows a new article exists. Instead of manually searching site:[yourdomain.com/blog-post-slug](https://yourdomain.com/blog-post-slug) in Google (which is notoriously imprecise and cached), GSC gives you exact server-level verification.
Goldmine Keyword Discovery
In Google Analytics, keyword data has been masked behind (not provided) for over a decade due to privacy protocols. GSC is the only place on the internet where Google gives you raw, first-party data showing the exact phrases people typed before clicking on your URL.
This is exceptionally powerful when doing keyword research or optimizing posts around high-paying AdSense topics. You’ll often discover that a post you wrote about one topic is getting thousands of impressions for a slightly different long-tail phrase you didn’t even optimize for, see our guide on finding low competition keywords“>finding low competition keywords — or optimizing posts around high-paying AdSense topics.
Automated Warning System
Google doesn’t expect you to log into GSC every five minutes. Once verified, Google will automatically send email alerts to your primary account if it detects:
- Security breaches or malware injections.
- Manual actions (penalties issued by human quality raters).
- Spikes in mobile usability failures.
- Broken structured data (Schema) markup.
Measuring Real-World UX
Google uses real user metrics collected from Chrome browsers (the Chrome User Experience Report, or CrUX) to evaluate your site’s speed and visual stability. GSC displays this data directly under the Core Web Vitals tab, giving you field data rather than synthetic laboratory tests.
Setting Up GSC Without Breaking Anything
Setting up GSC involves proving to Google that you actually own the domain. Because Search Console reveals sensitive keyword performance and indexing data, Google won’t let anyone access it without verification.
To begin, navigate to the Google Search Console Welcome Page and sign in with the primary Google account associated with your website. Click Add Property.
You’ll be prompted to choose between two property types:
Why You Should Choose the Domain Property
Always take the extra five minutes to set up a Domain Property.
If you set up a URL Prefix property for [https://dgsofthub.com](https://dgsofthub.com), but someone links to [https://dgsofthub.com](https://dgsofthub.com) or [https://www.dgsofthub.com](https://www.dgsofthub.com), GSC will treat those as completely separate websites. You end up with fragmented data across multiple properties. A Domain Property aggregates everything into a single, comprehensive view.
Step-by-Step DNS TXT Verification Guide
Setting up a Domain Property requires adding a DNS TXT record at your domain registrar or DNS provider (such as Cloudflare, Namecheap, GoDaddy, or Hostinger).
| DOMAIN PROPERTY (Recommended) | URL PREFIX PROPERTY |
|---|---|
Covers http://, https://, www, and all subdomains simultaneously. | Covers ONLY the exact string entered (e.g., https://dgsofthub.com). |
| Requires DNS TXT verification at the domain registrar or CDN level. | Verified via simple HTML file upload, meta tag, or Google Analytics link. |
| Examples covered: • https://dgsofthub.com• https://www.dgsofthub.com• https://dgsofthub.com• https://store.dgsofthub.com | Example covered: • https://dgsofthub.com ONLYMisses:• http:// or subdomains |
Step 1: Copy the Google Verification Token
When you select “Domain Property” and enter your root domain (e.g., dgsofthub.com), GSC will generate a unique string of text that looks like this: google-site-verification=x7Y_9kL1pZ3vR8mQ2wE4tY6uI8oP0aS
Step 2: Open Your DNS Settings
Log into the service that manages your DNS records.
- Note: If you are using Cloudflare or a dashboard-level CDN, you must add this record inside Cloudflare, not inside your basic hosting provider (like Namecheap or Hostinger). If Cloudflare is handling your nameservers, changes made at your host won’t propagate.
Step 3: Add the TXT Record
Add a new DNS record with the following parameters:
- Type: TXT
- Name / Host / Hostname: @ (or leave it blank, depending on your DNS host—@ represents the root domain).
- TTL: Auto or 3600 (1 hour).
- Value / Content: Paste the exact google-site-verification=… string provided by Google.
Step 4: Verify in GSC
Return to Google Search Console and click Verify.
Where people get stuck: DNS propagation isn’t always instantaneous. While Cloudflare updates in under 60 seconds, some domain registrars can take up to 15–30 minutes to update globally. If GSC says “Verification failed,” don’t panic. Wait 15 minutes, keep the record in place, and click Verify again.
Your First 30 Minutes in Search Console
- Verify property.
- Submit sitemap.
- Inspect homepage.
- Inspect one blog post.
- Check indexing report.
- Bookmark Performance report.
Before Google Search Console can begin collecting data, you must verify that you own your website. For a Domain Property, Google recommends DNS TXT record verification, which confirms ownership of your entire domain—including all subdomains and both HTTP and HTTPS versions. This one-time verification provides the most comprehensive coverage for long-term SEO monitoring.
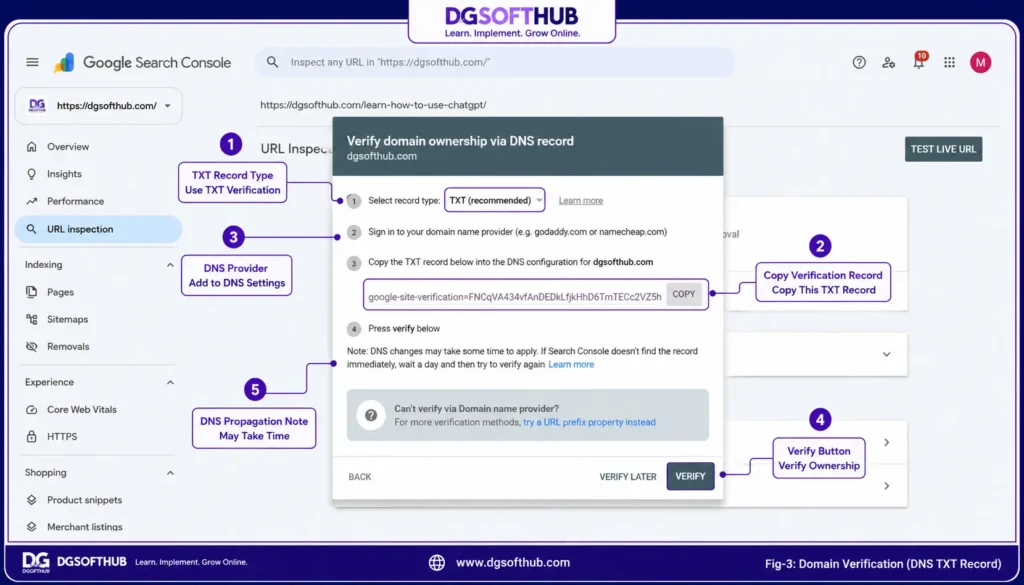
DGSoftHub Insight: DNS propagation may take anywhere from a few minutes to several hours, depending on your DNS provider. If verification doesn’t succeed immediately, wait for the changes to propagate before trying again. Also, keep the TXT record in your DNS settings to maintain ongoing ownership verification.
Alternative: URL Prefix Verification Methods
If you cannot access your DNS settings, you can fall back to a URL Prefix Property. Here are the three cleanest ways to verify it:
- HTML File Upload: Download the small .html file provided by GSC and upload it to your site’s root directory (/public_html/) via FTP or cPanel File Manager.
- HTML Tag via SEO Plugin: Copy the <meta name=”google-site-verification” content=”…” /> string and paste it into the Webmaster Tools section of AIOSEO or RankMath.
- Google Analytics Verification: If your site already runs GA4 using the gtag.js snippet in your site header, click “Verify via Google Analytics.” (Must be signed in with the same Google account).
Submitting Your Sitemap the Right Way
An XML sitemap is a machine-readable document listing every important URL on your website. Think of it as giving Googlebot a direct GPS route to your content, ensuring it doesn’t waste time trying to discover pages through complex link depth alone.
WordPress Site
➔
sitemap.xml
➔
Googlebot
Generating Your Sitemap in WordPress
If you are running a modern WordPress stack, you do not need to create an XML sitemap manually. SEO plugins handle this in the background:
- AIOSEO: Automatically generates your sitemap at [yourdomain.com/sitemap.xml](https://yourdomain.com/sitemap.xml). You can inspect and toggle which post types (Posts, Pages, WooCommerce Products) are included under AIOSEO > Sitemaps.
- Rank Math / Yoast SEO: Works similarly, outputting the index at [yourdomain.com/sitemap_index.xml](https://yourdomain.com/sitemap_index.xml).
Official Google Reference: According to Google Search Central Sitemap Guidelines, a single sitemap file cannot exceed 50MB (uncompressed) or 50,000 URLs. If your site expands beyond this, your SEO plugin will automatically split your sitemaps into a sitemap index file containing child sitemaps (e.g., post-sitemap.xml, page-sitemap.xml).
Step-by-Step Sitemap Submission Guide
- Open Google Search Console and select your verified property.
- In the left navigation sidebar, click Sitemaps under the Indexing header.
- Under the “Add a new sitemap” input field, type your sitemap URL path:
- Enter sitemap.xml (or sitemap_index.xml depending on your plugin).
- Click Submit.
GSC Action
Understanding Sitemap Statuses
Once submitted, your sitemap will sit in a status table directly below the input field. Here is what those statuses actually mean:
- Success (Green): Google successfully downloaded and parsed your XML sitemap. It found no syntax errors and has added those URLs to its crawl queue.
- Has Errors (Yellow): Google read the file, but encountered issues with individual URLs inside it (e.g., your sitemap contains a URL that leads to a 404 page or is blocked by noindex).
- Couldn’t Fetch (Red): Google failed to access the sitemap file entirely.
Hands-On Troubleshooting Note: “Couldn’t fetch” is the most common false alarm for beginners. If you just published a brand new site or activated a security plugin, Googlebot might hit a temporary caching wall.
Before tearing down your site configuration, click on the red error message. If it says “Sitemap could not be read,” paste your sitemap URL into an incognito browser window. If it loads cleanly in your browser, wait 24 hours and re-submit the URL in GSC. 9 times out of 10, it will clear itself automatically.
Once your website has been verified, the next step is to submit an XML sitemap. A sitemap helps Google discover important pages more efficiently, especially on new, large, or frequently updated websites. Although submitting a sitemap doesn’t guarantee that every page will be indexed, it gives Google a structured list of URLs to crawl and monitor.
Official Google Resource:
- Google Search Central – Sitemaps Overview
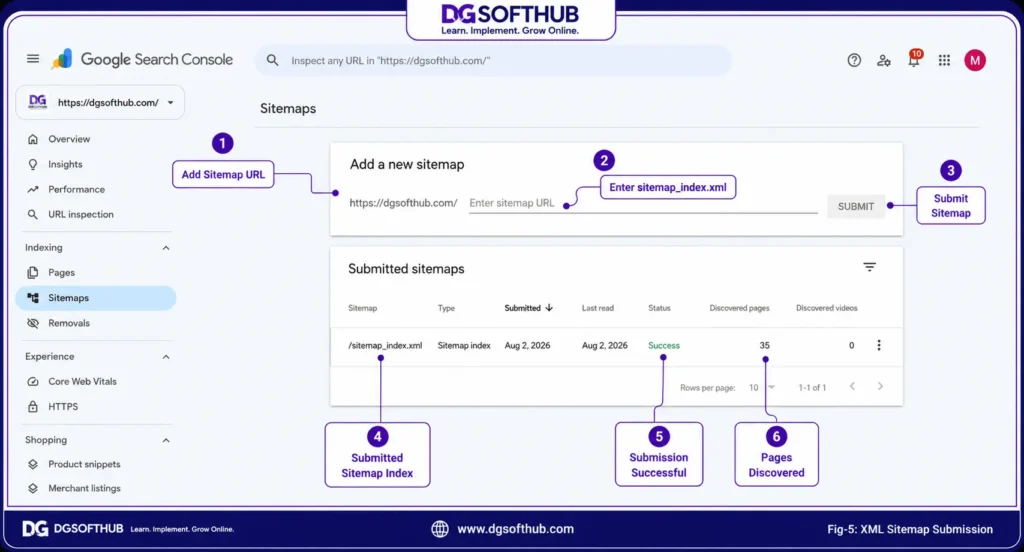
DGSoftHub Insight: Most modern WordPress SEO plugins, including AIOSEO, automatically generate an XML sitemap. In most cases, you only need to submit the sitemap once. Google will periodically revisit it to discover newly published or updated content.
Dashboard, Performance Analysis, & URL Inspection
The Dashboard: What Actually Matters
When you log into Google Search Console, the Overview dashboard presents a aggregated snapshot of your site’s health across three main categories: Performance, Indexing, and Experience.
| Overview Dashboard Breakdown | |
|---|---|
| Performance | Total Web Search Clicks (Line Chart) |
| Indexing | Valid vs. Not Indexed Pages Summary |
| Experience & Enhancements | Core Web Vitals, Mobile Usability, & Schema Validation Errors |
It is easy to get lost in the charts, but as a solo webmaster or blogger, you should view the Overview dashboard as an early-warning system, not an analysis workspace.
What to Look For in the First 60 Seconds:
- Performance Trend Line: Look for sharp drop-offs or uncharacteristic zero-click valleys. A sudden steep drop (rather than a slow downward drift) usually points to a site-wide server outage, a broken SSL certificate, or an accidental robots.txt disallow rule.
- Indexing Discrepancy: Compare your valid indexed pages to your “Not Indexed” count. If your unindexed count suddenly spikes by hundreds of URLs overnight, you likely have a parameter URL leak, tag/category archive explosion, or a security breach generating soft-404 pages.
- Enhancements Health: Check for red error indicators under Mobile Usability, Breadcrumbs, or Sitemaps. If Google flags rich snippet errors here, your search appearance enhancements (like review stars or FAQ drop-downs) may be temporarily revoked in search results.
How to Read the Performance Report
The Performance Report is the operational core of GSC. It shows you the exact bridge between what users type into Google and how your content performs in response.
Click Performance Search Results in the left sidebar.
GSC Summary
Deconstructing the 4 Core Metrics
Ensure all four metric toggle boxes at the top of the chart are checked so they illuminate with their respective colors:
- Total Clicks (Blue): The number of times a user clicked a SERP link leading to your domain. Note: Clicks are counted even if the user bounces back to Google immediately.
- Total Impressions (Purple): The number of times a URL from your site appeared in a SERP seen by a user. The link does not need to be scrolled into view to count as an impression unless it sits on a subsequent results page (page 2, 3, etc.
- Average CTR (Green): Calculated as (Clicks ÷ Impressions) × 100. A low CTR indicates that while your page is appearing for queries, your SEO title and meta description aren’t compelling enough to win the user’s click.
- Average Position (Orange): The average ranking of your top URL for a given query. Position 1–10 represents page one of Google search results.
Advanced Performance Report Filtering & Regex Workflows
To turn raw search data into actionable content upgrades, generic metrics aren’t enough. You need custom filters and Regular Expressions (Regex).
Click the + NEW button at the top of the Performance report to layer filters:
[ + NEW ] ──► Filter by: [ Query… ] [ Page… ] [ Country… ] [ Device… ] [ Search Type… ]
Filter by:
🔍 Query…
📄 Page…
🌍 Country…
📱 Device…
🖼️ Search Type…
Stripping Branded Queries to See True Organic Discovery
If your domain name is “DGSoftHub,” people searching “DGSoftHub blog” skew your position and CTR data because branded intent naturally gets a high CTR.
- Click + NEW Query…
- Select Queries not containing
- Type your brand name: dgsofthub
Now, the performance report reflects pure discovery traffic from users who didn’t know your site existed prior to searching.
Using Regex to Find High-Intent Question Queries
Users asking questions are prime audiences for tutorials, product comparisons, and affiliate guides. You can isolate all question-based searches using a simple Regex string:
- Click + NEW Query…
- Switch the dropdown from Filter to Custom (Regex)
- Select Matches regex
- Paste this regex pattern: ^(who|what|where|when|why|how|can|is|are|does|do)\b
This instantly filters thousands of queries down to the exact questions users are asking in your niche. If you spot a question with high impressions but low clicks, add that exact question as an <h2> heading or FAQ section in your post, see our full on-page SEO checklist for structuring these updates.
Google Search Console’s Custom (Regex) filter lets you isolate specific query patterns instead of reviewing every search term manually. In the example below, the regex filter returns only question-based queries, making it easier to identify topics with strong informational search intent. This technique is particularly useful for expanding existing articles, planning new blog posts, and discovering FAQ opportunities based on real user searches.
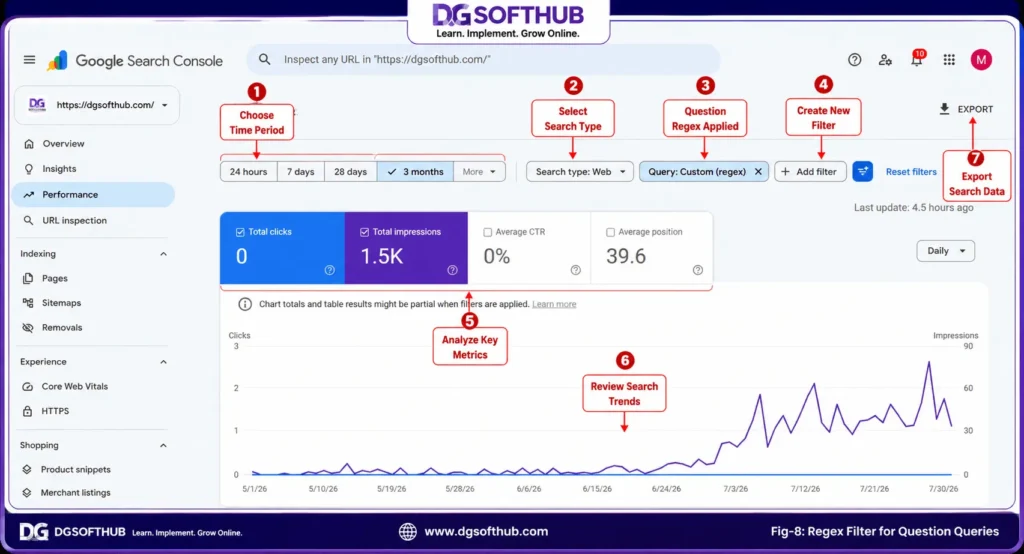
DGSoftHub Insight: Look for queries with high impressions but low CTR after applying the regex filter. These often indicate topics where improving your page title, meta description, headings, or content can significantly increase organic clicks without needing additional rankings.
The “Page 2 Rescue” Optimization Workflow
This is one of the highest ROI SEO tactics available to solo bloggers. Pages sitting on “Page 2” (positions 11 through 20) have already earned Google’s baseline trust, but they sit just outside the high-traffic zone.
[ GSC Performance ] ──► [ Filter: Positions 11–20 ] ──► [ Sort by Impressions ] ──► [ Add Internal Links & Depth ]
Target Data
➔
Filter Range
➔
Prioritize
➔
Action Plan
Step-by-Step Execution:
- In the Performance Report, set the date range to Last 28 days (for fresh data).
- Ensure Average Position and Impressions are toggled on.
- Export the data to a Google Sheet or CSV using the EXPORT button in the top right.
- Filter your spreadsheet columns:
- Filter Position to show numbers between 11.0 and 20.0.
- Sort Impressions from Highest to Lowest.
- Analyze the gap: You now have a prioritized list of keywords where your site is on the cusp of page one traffic.
- Take Action:
- Open the ranking page for that query.
- Add the exact target phrase (or close variations) into a sub-heading, early paragraph, or image alt text.
- Build 2 to 3 contextual internal links from your higher-authority articles pointing directly to this target post using descriptive anchor text.
- The URL Inspection Tool (Your Troubleshooting Hub)
Located as a persistent search bar at the very top of the Search Console interface, the URL Inspection Tool allows you to analyze any specific URL on your domain down to the raw HTML DOM level.
🔍
Paste a URL into this bar and press Enter. GSC will fetch the recorded index state from Google’s primary database.
Understanding the Index Status Output
When the check finishes, you will see one of three primary status header cards:
Scenario A: “URL is on Google”
This means your page has been successfully crawled, rendered, processed, and indexed. It is eligible to appear in search results.
- Coverage Details: Expand the card to see the detected XML sitemap path, referring pages Google used to discover the URL, the last crawl timestamp, and the user-selected vs. Google-selected canonical URL.
Scenario B: “URL is on Google, but has issues”
The page is indexed, but Google detected minor errors that might limit its visibility or eligibility for rich results (e.g., mobile viewport sizing issues or missing required fields in Schema markup).
Scenario C: “URL is not on Google”
The page is completely invisible in search. Expanding the details will reveal why—such as a noindex header tag, a 404 response code, a canonical mismatch, or a crawl block inside robots.txt.
Live Test vs. Indexed Version: The Diagnostic Split
The data displayed initially by the Inspection tool represents the cached state from Google’s last crawl (which might be days or weeks old).
If you just updated a page or fixed a technical bug, click TEST LIVE URL in the top right corner.
Indexed Version (Stored Cache) vs. Live Test (Real-Time Fetch).
- What Googlebot saw previously
- May reflect outdated code
- What Googlebot sees RIGHT NOW
- Proves if your fix is working
What “Test Live URL” Checks:
- Real-time Accessibility: Can Googlebot fetch the page right now without hitting a server timeout or 5xx block?
- DOM Rendering: Click VIEW TESTED PAGE Screenshot to see the actual visual layout Googlebot rendered. This helps ensure your mobile menus, scripts, or CSS aren’t accidentally blocking your main content.
- HTTP Headers: Check the raw HTTP response code to confirm your server is outputting a clean 200 OK status.
How to Correctly Use “Request Indexing”
When you publish a new blog post or complete a major rewrite on an old piece, click REQUEST INDEXING inside the URL Inspection interface.
Submit URL
➔
Googlebot Priority Queue
➔
Crawled within 24–48 Hours
Important Rules for Requesting Indexing:
- Don’t Spam the Button: Requesting indexing on the same URL multiple times does not speed up the crawler. It places the request at the back of the queue.
- Rate Limits: Google enforces soft quotas on manual indexing requests per property per day. Use this button for priority content updates, not for every minor typo fix across hundreds of pages.
- Bulk Indexing Strategy: If you updated 50 posts at once, do not click “Request Indexing” 50 times. Instead, update your XML sitemap, re-submit the sitemap URL in GSC, and let Googlebot crawl the structure naturally.
According to Google’s official documentation, the URL Inspection tool allows you to check a page’s indexing status, test whether Google can access the live version of the URL, and request a recrawl after publishing significant content updates or fixing technical issues. Google also emphasizes that requesting indexing does not guarantee immediate indexing or improved search rankings—it simply asks Google to reconsider the page for crawling.
Official Google Resource:
- Google Search Console Help – URL Inspection Tool
The URL Inspection Tool is one of the most valuable features in Google Search Console. It allows you to verify whether a specific page is indexed, review Google’s latest crawl information, inspect enhancements, and request re-indexing after publishing significant updates. For content that has been substantially revised, this tool provides the fastest way to notify Google that the page is ready to be crawled again.
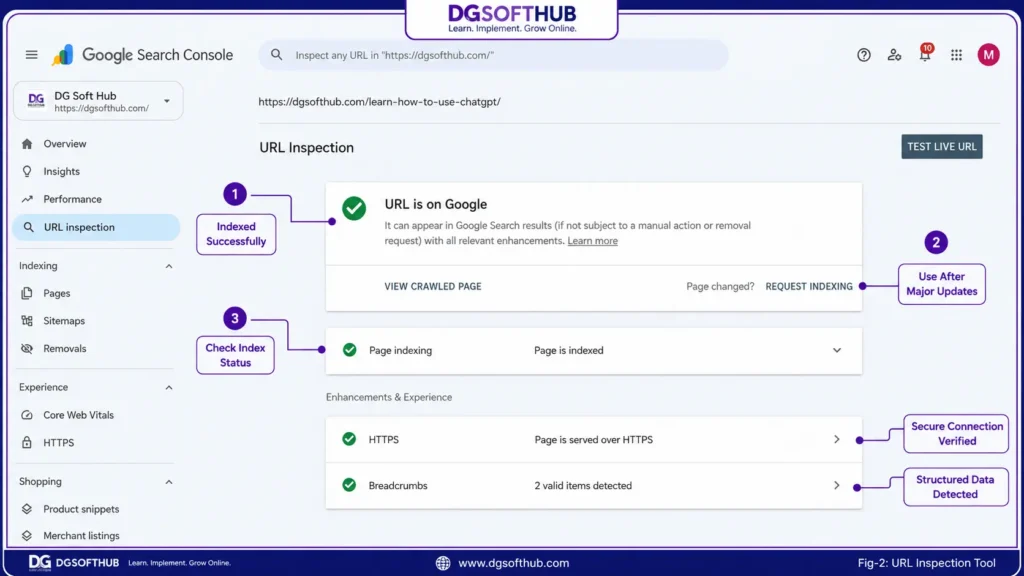
DGSoftHub Insight: Use the Request Indexing feature only after making meaningful improvements to a page, such as updating content, fixing technical issues, or adding substantial new information. Repeatedly requesting indexing without significant changes does not speed up crawling and offers little benefit.
Demystifying Indexing Reports (And When to Panic)
To view your site’s full index breakdown, click Pages under the Indexing tab in the left navigation menu.
This screen divides your site’s URLs into two main categories:
- Indexed Pages (Green): URLs currently residing in Google’s searchable database.
- Not Indexed Pages (Grey/Red): URLs that Googlebot has discovered or crawled, but deliberately excluded from search results.
The #1 Golden Rule of Indexing: A high number of “Not Indexed” pages is not automatically a bad thing. You do not want every URL generated by WordPress to appear in Google Search. Pages such as pagination archives, shopping carts, search result pages, query parameter URLs, draft previews, and login pages are typically better left out of the index.
Understanding the Page Indexing Report
According to Google’s official documentation, the Page Indexing report helps website owners understand why specific URLs are indexed or excluded from Google Search. Google also emphasizes that not every excluded page indicates a problem. Many exclusion statuses are expected and intentional, so your focus should be on investigating only those issues that affect important pages you want Google to index.
Official Google Resource
- Google Search Central – Page Indexing Report
Detailed Breakdown of Exclusions & Errors
Scroll down to the “Why pages aren’t indexed” table. Below are the most common indexing statuses you’ll encounter, what they mean, and whether they require your attention:
- Crawled – Currently Not Indexed
- What it means: Googlebot fetched the URL, fully parsed its text and structure, but ultimately decided not to store it in its primary search database.
- The Cause: This is almost always a content quality signal. Google felt the page lacked sufficient depth, contained duplicate information already available on the web, or provided insufficient original experience.
- Action Required? YES. Review the post for thin content. Expand it with original data, real-world examples, screenshots, or clearer topical relevance.
- Discovered – Currently Not Indexed
- What it means: Google knows the URL exists (it found it via your sitemap or an internal link), but it has not actually visited or rendered the page code yet.
- The Cause: Usually caused by a crawl budget bottleneck or an unestablished site authority baseline. If your server responds slowly or your domain is brand new, Google limits how many pages it crawls per day.
- Action Required? MAYBE. If this happens to brand-new posts for a few days, be patient. If posts sit here for weeks, build contextual internal links from your top-performing, already-indexed articles to pass internal authority.
- Excluded by ‘noindex’ Tag
- What it means: Googlebot visited the page, read the <meta name=”robots” content=”noindex”> directive in the HTML header, and respected your instruction to keep it out of search.
- Action Required? NO (usually). This is correct for thank-you pages, category archives (if disabled in AIOSEO), and admin pages. However, if a main blog post shows up here, check your SEO plugin settings immediately to clear the accidental “noindex” toggle.
- Blocked by robots.txt
- What it means: Your site’s robots.txt file contains a explicit Disallow: rule instructing search bots not to crawl the URL.
- Action Required? ONLY IF UNINTENDED. Verify your robots.txt file to ensure you aren’t blocking important content folders like /blog/ or /wp-content/uploads/.
- Duplicate without User-Selected Canonical
- What it means: You have two or more pages with identical or near-identical content, and you did not specify a master version using a <link rel=”canonical” href=”…”> tag. Google picked one arbitrarily and excluded the rest.
- Action Required? YES. Set explicit canonical URLs using your SEO plugin to tell Google which exact version to treat as the primary ranking target.
- Soft 404
- What it means: The URL returns a 200 OK HTTP status code to the browser, but the rendered content looks like an error page (e.g., an empty category page, a blank search results page, or a “Product Out of Stock” template).
- Action Required? YES. Either redirect the blank URL to a relevant live page using a 301 redirect, or update the server code to issue a true 404 Not Found response code.
| INDEXING STATUS | ACTION REQUIRED | PRIORITY |
|---|---|---|
| Crawled – Currently Not Indexed | Improve content depth, uniqueness, & internal links | High |
| Discovered – Currently Not Indexed | Allow time; build contextual internal links | Medium |
| Excluded by ‘noindex’ | Verify it’s not accidentally blocking a main blog post | Low |
| Duplicate without Canonical | Set explicit canonical tags in AIOSEO | Medium |
| Soft 404 | Redirect blank page or return true 404/410 HTTP code | High |
Indexing Troubleshooting, Core Web Vitals, & WordPress Integration
INDEX ERROR DETECTED IN GSC
- Check
robots.txtrules - Verify Canonical tags
- Inspect HTTP Response Headers
- Perform Content Audit
- Add First-Hand Experience (E-E-A-T)
- Build Contextual Internal Links
🎁 Free Takeaway: Google Search Console Action Checklist (2026 Edition)
If you’re serious about improving your website’s SEO, this printable checklist will help you stay on track.
Instead of trying to remember every report and maintenance task, follow a simple workflow that covers setup, indexing, performance monitoring, Core Web Vitals, and monthly SEO reviews.
Your free download includes:
- ✅ One-Time Setup Checklist
- ✅ Weekly Monitoring Checklist
- ✅ Monthly SEO Review Checklist
- ✅ Indexing Status Decoder
- ✅ Core Web Vitals Reference
- ✅ Regex Cheat Sheet
- ✅ Monthly Progress Tracker
📄 Printable PDF • Free Download • Updated for 2026
👇 Download your free copy
Troubleshooting Checklists for Indexing Failures
When Google Search Console flags indexing issues, staring at a list of URLs can feel overwhelming. Use these practical troubleshooting workflows to diagnose and resolve errors systematically.
- Check robots.txt • Perform Content Audit
- Verify Canonical tags • Add First-Hand Experience
- Inspect HTTP Response Headers • Build Contextual Internal Links
Workflow A: Resolving “Crawled – Currently Not Indexed”
This is almost always an indicator that Googlebot read your page, evaluated its depth against existing web pages, and chose not to allocate index space to it.
➔
2. Add First-Hand Proof
➔
3. Build Internal Links
➔
4. Re-Inspect
For guidance on structuring quality posts from scratch, see our guide on writing content that satisfies search intent.
Workflow B: Fixing “Soft 404” Errors
A Soft 404 occurs when a page returns a success code (200 OK) to the browser, but Googlebot’s rendering engine perceives the page as empty or non-existent.
Check HTTP Code (200 OK)
➔
Inspect Rendered DOM
- [ ] Step 1: Inspect the Rendered DOM. Open the URL in the Inspection Tool and click VIEW TESTED PAGE Screenshot. Look for empty templates, missing product grids, or broken database queries.
- [ ] Step 2: Check Category & Tag Archives. If the URL is an empty WordPress category (e.g., /category/uncategorized/), assign blog posts to that category or set the category archive to noindex in AIOSEO.
- [ ] Step 3: Fix Out-of-Stock WooCommerce Pages. If the URL is an out-of-stock product page displaying “Product Not Found,” either add relevant recommended products to maintain content depth or issue a 301 redirect to the primary category page.
- [ ] Step 4: Update HTTP Headers. If the page is truly gone and has no replacement, configure your server or redirection plugin to return a true 404 Not Found or 410 Gone HTTP status.
Workflow C: Clearing “Duplicate without User-Selected Canonical”
When Google encounters multiple paths to identical content without explicit canonical instructions, it selects a master version automatically and drops the duplicates into this exclusion bucket.
• https://dgsofthub.com/blog-post/?ref=newsletter
Set Explicit Canonical Tag
- [ ] Step 1: Identify URL Variants. Common culprits include tracking parameters (e.g., ?utm_source=…), print-friendly pages, or trailing slash inconsistencies (/post vs /post/).
- [ ] Step 2: Set Master Canonical via AIOSEO. Open the post in the WordPress editor, scroll down to the AIOSEO Settings meta box, navigate to the Advanced tab, and explicitly define the preferred master URL in the Canonical URL field.
- [ ] Step 3: Verify the HTML Source. Open the live page in your browser, view the page source (Ctrl + U or Cmd + Option + U), and search for <link rel=”canonical”. Confirm it points strictly to your preferred master URL.
- [ ] Step 4: Validate in GSC. Run the URL through the URL Inspection Tool and verify that User-declared canonical matches your entered string.
Core Web Vitals & Real-World Site Speed
Google’s Core Web Vitals (CWV) metrics measure real-world user experience (UX) signals collected from actual Chrome browsers (the CrUX dataset).
Navigate to Experience Core Web Vitals in Search Console. GSC splits performance into separate report cards for Mobile and Desktop.
| METRIC | GOOD (PASS) | NEEDS IMPROVEMENT / POOR |
|---|---|---|
| LCP (Loading Speed) | ≤ 2.5 seconds | > 2.5s – 4.0s+ |
| INP (Responsiveness) | ≤ 200 ms | > 200ms – 500ms+ |
| CLS (Visual Stability) | ≤ 0.10 | > 0.10 – 0.25+ |
The Three Core Metrics Explained
- LCP (Largest Contentful Paint)
LCP measures how long it takes for the largest visible element on the screen (usually a featured image, background hero visual, or main headline block) to render fully.
- Primary Causes of Failure: Uncompressed hero images, slow server response times (TTFB), blocking render-blocking CSS/JS files.
- INP (Interaction to Next Paint)
INP measures page responsiveness by tracking the delay between a user interaction (clicking a button, tapping an Elementor accordion, opening a mobile menu) and the visual frame update on screen.
- Primary Causes of Failure: Heavy main-thread JavaScript execution, bloat from third-party tracking scripts (ad tags, heatmaps), unoptimized WooCommerce scripts running on non-eCommerce pages.
- CLS (Cumulative Layout Shift)
CLS measures visual stability. It calculates how much page layout unexpectedly shifts while loading assets.
- Primary Causes of Failure: Images missing explicit width and height HTML attributes, late-loading web fonts causing FOIT/FOUT, dynamically injected ad banners without reserved container height.
Understanding How Google’s SEO Tools Work Together
Many website owners expect Google Search Console to answer every SEO question. In reality, each Google tool serves a different purpose. Knowing which tool to use for which task will help you diagnose issues faster and make more informed optimization decisions.
| TOOL | PRIMARY PURPOSE | BEST USED FOR | DATA SOURCE |
|---|---|---|---|
| Google Search Console | Monitor your website’s visibility in Google Search | Search queries, indexing status, crawl issues, CTR, average position, and technical SEO diagnostics | Google Search Data |
| Google Analytics 4 (GA4) | Analyze visitor behavior after they arrive on your website | User engagement, traffic sources, conversions, events, and audience insights | Website User Activity |
| PageSpeed Insights | Evaluate page loading performance | Identifying performance bottlenecks and optimization opportunities using both Lab and Field data | Lighthouse + CrUX |
| Core Web Vitals Report (Search Console) | Monitor real-world page experience over time | Tracking LCP, INP, and CLS across groups of pages using actual visitor data | CrUX Field Data |
DGSoftHub Insight
Rather than relying on a single platform, use each Google tool for the task it was designed to perform:
- Google Search Console → How is my website performing in Google Search?
- Google Analytics 4 → How do visitors interact with my website after they arrive?
- PageSpeed Insights → What is slowing down this specific page, and how can I improve it?
- Core Web Vitals Report → Are real users experiencing performance issues across my website over time?
Once you’ve identified performance and technical issues using the appropriate Google tools, the next step is implementing practical optimizations. For most WordPress websites, many of these improvements can be achieved without writing code by configuring the right plugins and hosting features.
Practical WordPress Optimization: The Zero-Code Speed Stack
You do not need a custom web developer to achieve green Core Web Vitals scores in WordPress. You can optimize your stack using a practical three-tier approach:
Image Optimization
- Compress via TinyPNG
- Serve WebP Formats
Edge Caching
- LiteSpeed Cache
- Page Caching
Script Handling
- Defer Non-Essential JS
- Reserve Ad/Image Dimensions
Step 1: Optimize Media Assets
- Convert Images to WebP: Use an image plugin or pre-process your images through TinyPNG before uploading. WebP formats reduce file sizes by 30–50% compared to standard JPG/PNG files without noticeable quality loss.
- Enforce HTML Dimensions: Ensure your theme automatically inserts explicit width=”800″ and height=”450″ attributes on <img> tags to eliminate CLS layout shifts.
Step 2: Configure Page Caching & Minification
- LiteSpeed Cache Integration: If your host runs a LiteSpeed web server, activate the LiteSpeed Cache plugin. Enable CSS/JS Minification, set Combine CSS to off (to prevent massive render-blocking files), and turn on Local Font Caching.
- Enable CDN at the Dashboard Level: Activate CDN integration to cache static assets (images, stylesheets) at edge locations near your visitors, dramatically improving Time to First Byte (TTFB) and LCP globally.
pairing this with our list of free tools worth trying first can help you find the right plugins without spending anything.
According to Google’s official documentation, Core Web Vitals are a set of real-world user experience metrics that measure three key aspects of page performance: loading speed (Largest Contentful Paint – LCP), responsiveness (Interaction to Next Paint – INP), and visual stability (Cumulative Layout Shift – CLS). Google considers these metrics as part of its broader page experience evaluation, making them important for both usability and long-term SEO success.
Official Google Resource
- Google Search Central – Core Web Vitals
The Core Web Vitals report helps you evaluate how real visitors experience your website on mobile and desktop devices. Unlike lab-based speed tests, it uses real-world Chrome User Experience Report (CrUX) data to identify pages that require performance improvements. New websites may temporarily display “Not enough usage data” until sufficient real-user data has been collected.
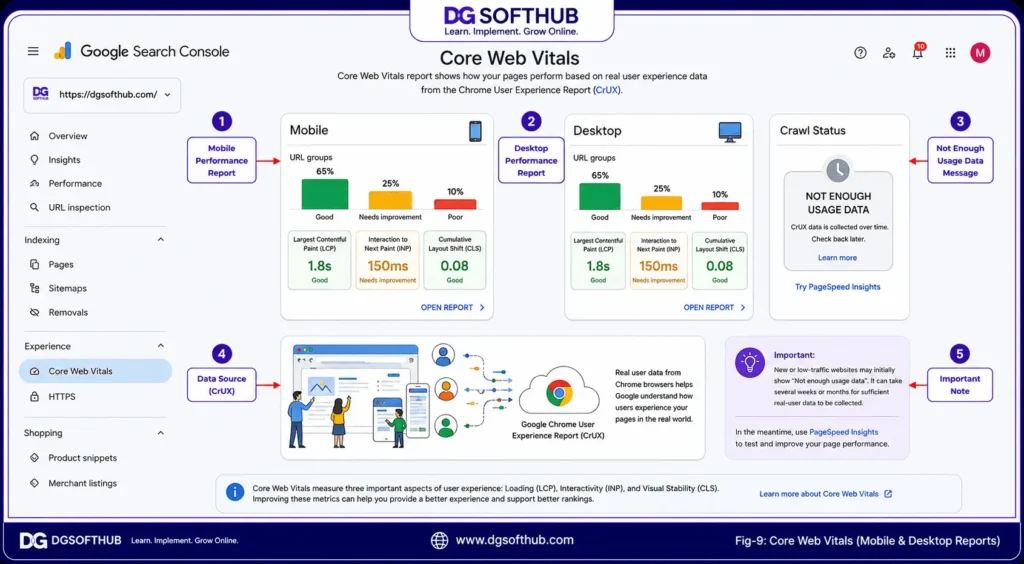
DGSoftHub Insight
New websites often won’t have enough Core Web Vitals field data immediately. Continue optimizing your pages with PageSpeed Insights, publish consistently, and monitor this report over time. Once Google collects sufficient Chrome User Experience Report (CrUX) data from real visitors, Search Console will begin displaying your site’s Core Web Vitals performance.
Security, HTTPS, and Links
Beyond indexing and speed, Google Search Console monitors the structural integrity and security compliance of your domain.
The HTTPS Report
Located under Experience HTTPS, this report validates that your SSL certificate is functioning correctly across all indexed pages.
HTTPS Active: Encrypted protection confirmed across 142 indexed pages.
Mixed Content Clean: 0 URLs served over insecure HTTP or containing mixed assets.
Fixing “Mixed Content” Warnings
If GSC flags non-secure URLs, it usually means your page is running on https://, but internal image assets or hardcoded stylesheets inside your theme are still loading via insecure http:// paths.
- The Fix: Install a simple plugin like Really Simple SSL or perform a database search-and-replace updating [http://yourdomain.com](http://yourdomain.com) to [https://yourdomain.com](https://yourdomain.com).
Security & Manual Actions
These two tabs under Security & Manual Actions should ideally stay completely blank with a reassuring green checkmark: “No issues detected.”
Issued manually by human Google raters when a site fails to comply with webmaster guidelines due to deceptive tactics or spam.
Triggered automatically by Google algorithms when malware, injected scripts, or site compromises are detected.
- Manual Actions: If a human reviewer determines your site violates Google’s Search Essentials (e.g., sneaky redirects, purchased link schemes, generated doorway pages), a manual penalty notice will appear here along with options to submit a Reconsideration Request once cleared.
According to Google’s official Search Essentials, manual actions are applied when Google’s review systems determine that a website has violated its spam policies or attempted to manipulate search rankings through practices that conflict with Google’s guidelines. These actions can affect the visibility of individual pages or an entire website in Google Search. Following Search Essentials helps ensure your site remains eligible for indexing and ranking while maintaining long-term search visibility.
Official Google Resource
- Google Search Central – Search Essentials
Unlike algorithmic ranking fluctuations, manual actions require direct intervention. Google Search Console explains the reason for the action, identifies the affected pages where applicable, and outlines the steps you must take before submitting a Reconsideration Request for review.
- Security Issues: Flags malicious script injections, phishing landing pages created by hackers, or unsafe download links hosted on your server.
The Links Report
Click Links at the bottom of the left navigation sidebar. This report gives you direct visibility into your domain’s authority profile divided into two main categories:
| EXTERNAL LINKS (Backlinks) | INTERNAL LINKS |
|---|---|
| Top linking domains | Distribution of internal links |
| Top linked pages from outside | Top linked internal pages |
| Top linking anchor text | Identifies orphaned or weak pages |
Leveraging Internal Link Equity
Search crawlers use internal links to discover context and distribute page authority across your site.
- Open Internal Links Top linked pages.
- Sort by Internal links (Lowest to Highest).
- Identify cornerstone content or revenue-generating product pages that sit near the bottom with only 1 or 2 internal links.
- Open your top-linked articles and add contextual inline links pointing directly to those under-linked target pages.
Connecting GSC to Your WordPress Stack
To ensure Search Console receives clean, actionable signals, your WordPress configuration needs to align with search engine guidelines.
Generates XML Sitemaps & Canonical Tags
Optimizes Core Web Vitals & Caching
Injects Structured Data (Rich Snippets)
Sends Clean Technical & Quality Signals
AIOSEO Configuration Checklist
- [ ] Automated Sitemaps: Confirm AIOSEO > Sitemaps is enabled and set to exclude unnecessary archives (e.g., Author Archives, Date Archives) from the generated index.
- [ ] Canonical Tags: Ensure default canonical settings point dynamically to %post_url% to avoid tracking parameter duplication.
- [ ] Breadcrumb Schema: Enable AIOSEO Breadcrumbs. GSC will monitor these under Enhancements > Breadcrumbs, helping you win clean breadcrumb pathways in SERP listings.
Structured Data (Schema) Mapping
Structured data allows search engines to understand the exact context of your content (e.g., distinguishing a recipe from a product review or a step-by-step tutorial).
- Use AIOSEO to map your content types:
- Blog Posts Article or BlogPosting Schema
- Tutorials HowTo Schema
- FAQ Sections FAQPage Schema
Once deployed, GSC will populate an Enhancements tab in the sidebar where you can monitor valid rich results and debug missing Schema fields.
Beginner Mistakes, Checklists, FAQs, & Action Plan
Four Mistakes Most Beginners Make
Even experienced bloggers occasionally misinterpret Google Search Console data or make tactical errors that cost them organic traffic. Here are four common traps to avoid:
Panicking over intentional “Not Indexed” status exclusions (e.g., admin pages, tags, or redirected URLs).
Treating Search Console like a real-time analytics engine instead of a delayed diagnostic tool.
Ignoring “Crawled – Currently Not Indexed” quality flags, which signal content value issues.
Rewriting dozens of URLs simultaneously without tracking performance baseline data first.
Mistake 1: Panicking Over Intentional Exclusions
When beginners look at the Indexing Overview chart and see 200 “Not Indexed” pages alongside 50 “Indexed” pages, their immediate reaction is panic.
They start trying to force Google to index WooCommerce tag archives, cart URLs, paginated blog archives (/page/2/), or administrative draft previews.
The Reality: Indexing unnecessary URLs dilutes your site’s crawl budget and spreads topical authority thin across low-value pages. You only want your primary posts, distinct pages, and core products in Google’s database.
Mistake 2: Treating GSC Like Real-Time Analytics
Google Search Console data is not real-time. Performance data lags by roughly 24 to 48 hours, and Core Web Vitals reports rely on 28-day rolling averages from the Chrome User Experience Report (CrUX).
The Reality: Checking Search Console multiple times a day to measure the impact of an article published this morning is a waste of time. Give Googlebot time to discover, crawl, render, and update its records before making adjustments.
Mistake 3: Ignoring “Crawled – Currently Not Indexed” Signals
This status is often brushed off as a temporary technical glitch. In reality, it is Google’s quiet way of telling you that your content fell short of its quality or uniqueness bar.
The Reality: If a page sits in “Crawled – Currently Not Indexed” for more than two weeks, don’t just keep hitting the “Request Indexing” button. Revisit the content, add first-hand experience, insert original visuals or data, build contextual internal links, and then request re-indexing.
Mistake 4: Over-Optimizing Everything at Once
When bloggers learn about low-hanging fruit keywords (positions 11–20), they sometimes modify fifty URLs in a single weekend—changing permalinks, rewriting titles, and deleting paragraphs across their entire archive.
The Reality: If rankings drop the following week, you won’t know which specific edit caused the decline. Make updates systematically: optimize 2 to 3 target posts, document your changes and dates in a spreadsheet, wait 2–3 weeks to observe the SERP movement, and refine your approach based on real data.
A Realistic Weekly & Monthly Routine
Building a sustainable SEO workflow isn’t about living inside Search Console. It’s about setting up predictable operational habits.
| CADENCE | ACTIONABLE TASKS |
|---|---|
WEEKLY ⏱️ 10 Minutes |
|
MONTHLY ⏱️ 45 Minutes |
|
Downloadable Resources: The Weekly GSC Maintenance Checklist
Use this print-ready maintenance checklist to keep your WordPress site’s search health clean throughout the year.
📋 The DGSoftHub Search Console Maintenance Sheet
🟢 WEEKLY CHECKLIST (Est. Time: 10 Mins)
- [ ] 1. Overview Health Scan: Log into GSC and inspect the main Performance graph. Confirm there are no sudden, steep drops in search clicks.
- [ ] 2. Inspect New Content: Take any blog posts or product pages published over the last 7 days and run them through the URL Inspection Tool. Click Request Indexing to enter the crawl queue.
- [ ] 3. Security & Action Alerts: Verify that no red notifications appear under Security Issues or Manual Actions.
🔵 MONTHLY CHECKLIST (Est. Time: 45 Mins)
- [ ] 1. Low-Hanging Fruit Keyword Audit:
- Go to Performance > Search Results.
- Set date filter to Last 28 Days.
- Filter queries by Average Position (11.0 to 20.0) and sort by Impressions.
- Pick 2 target posts to refresh with updated headings, original details, and 3 internal links.
- [ ] 2. Indexing Error Scrub:
- Open Indexing > Pages.
- Review the Not Indexed reasons table.
- Check for unintended spikes in Soft 404, 5xx Server Error, or Blocked by robots.txt.
- [ ] 3. Core Web Vitals Field Check:
- Open Experience > Core Web Vitals.
- Review the Mobile status report. Ensure LCP stays under 2.5s, INP under 200ms, and CLS under 0.10.
- [ ] 4. Internal Link Audit:
- Go to Links > Internal Links.
- Identify priority posts that have fewer than 3 internal links pointing to them and add relevant inline links from higher-traffic pages.
- [ ] 1. Low-Hanging Fruit Keyword Audit:
Frequently Asked Questions
1- Is Google Search Console is a free tool?
Yes. Google Search Console is a 100% free tool provided directly by Google for anyone who owns or manages a website.
2- How long does it take for Search Console to start displaying data?
After verifying your domain property, it typically takes 24 to 48 hours for Google to process and display baseline performance and indexing data.
3- Why doesn’t Search Console match my Google Analytics traffic?
GSC measures clicks from Google Search results pages, whereas GA4 measures user sessions on your site. If a user clicks your link in search, leaves immediately, and clicks it again 3 minutes later, GSC records two clicks, but GA4 may consolidate them into a single user session.
4- What is a “good” Click-Through Rate (CTR) in GSC?
CTR varies depending on position and search intent. A position #1 ranking often earns a 25%–30% CTR, whereas a position #8 ranking might average 1%–3%. Focus on improving your own historical baseline rather than aiming for a generic industry standard.
5- Do I need to re-submit my XML sitemap every time I publish a post?
No. Once your XML sitemap is successfully submitted in GSC (e.g., via AIOSEO), Googlebot will automatically read the updated sitemap file whenever you publish or modify content.
6- Will removing a page from GSC delete it from my website?
No. Using the Removals tool in GSC temporarily hides the URL from Google Search results. It does not delete files, pages, or database entries from your web host.
7- What is the difference between “Crawled – Currently Not Indexed” and “Discovered – Currently Not Indexed”?
“Discovered” means Google knows the URL exists but hasn’t had the crawl capacity to visit it yet. “Crawled” means Google visited and parsed the page, but chose not to store it in its index, usually due to content quality or duplication concerns.
8- Does Google Search Console help with Bing or Yahoo SEO?
No. Search Console is exclusively for Google’s search engine. To manage visibility on Bing and Yahoo, set up a free account on Bing Webmaster Tools.
9- Why is my newly published post taking weeks to get indexed?
New sites or sites with limited internal link structure often have lower crawl priorities. You can speed up discovery by building contextual internal links from existing indexed pages and using the URL Inspection Tool to request indexing, also see our guide to getting traffic to a brand-new blog for a broader early-stage strategy.
10- Does fixing Core Web Vitals instantly boost my rankings?
Core Web Vitals is a real-world user experience ranking factor, but it acts primarily as a tie-breaker among relevant, high-quality pages. Improving CWV scores helps retain traffic and improve conversions, but content relevance and authority remain the dominant drivers.
11- Can I share access to my GSC property without sharing my Google password?
Yes. Go to Settings > Users and permissions in GSC and click Add user. You can grant Full or Restricted access using their Google email address.
12- What should I do if I get a “Server Error (5xx)” in my Indexing report?
A 5xx error means your host server failed to respond when Googlebot attempted to load the page. Check with your hosting provider to ensure your server isn’t experiencing resource exhaustion, security blocks, or downtime.
13- How many manual indexing requests can I make per day?
Google does not publish an exact hard limit, but properties are subject to a soft daily quota that varies by site. As a best practice, reserve manual indexing requests for important, newly published, or significantly updated pages rather than using them on every minor edit.
14- What is Interaction to Next Paint (INP)?
INP replaced FID (First Input Delay) as a Core Web Vitals metric. It measures how quickly a page updates visually after a user clicks, taps, or presses a key on your site.
15- Do I need to show my real name on my blog for Google to trust it?
While a real author name backed by clear background credentials supports Experience, Expertise, Authoritativeness, and Trust (E-E-A-T), pseudonyms or brand editorial names can work if supported by consistent, verifiable content quality.
16- Why did my impressions spike while my clicks stayed flat?
This usually happens when your page enters search results for broad, high-volume terms on pages 2, 3, or 4. Your link was loaded in SERP listings (generating impressions), but users didn’t scroll or click through to your site yet.
17- How do I fix a “Soft 404” on an out-of-stock product page?
Either add helpful alternative product recommendations and content depth to make the page useful, or set up a 301 redirect sending visitors to the main product category page.
18- Does GSC show keywords from private or incognito searches?
Yes. Performance data includes search metrics regardless of whether the user was logged into a Google account or browsing in private/incognito mode.
19- What happens if I change my WordPress permalink structure?
If you change your URL structure without setting up proper 301 redirects, GSC will log a wave of 404 errors, and your rankings will drop. Always set up site-wide 301 redirects before changing post slugs or permalinks.
20- Is Search Console’s “Average Position” calculated globally or locally?
Average Position aggregates rankings across all geographic locations, device types, and search instances. Your ranking for a specific user in a specific city may differ from the global average shown in GSC.
21- Does Request Indexing improve rankings?
Google has repeatedly clarified that the Request Indexing feature only asks Googlebot to recrawl a page. It doesn’t improve rankings by itself. Rankings depend on the overall quality, relevance, and usefulness of the content after it has been crawled and evaluated.
Reference
Google Search Central Documentation
Your Final Action Plan
Google Search Console is the ultimate source of truth for your website’s search performance. Take these four steps today to establish a clean foundation:
[ Step 1: Verify Domain Property ] ──► [ Step 2: Submit XML Sitemap ] ──► [ Step 3: Run Baseline Live Test ] ──► [ Step 4: Schedule Monthly Audit ]
Initial Setup
➔
Discovery
➔
Validation
➔
Maintenance
For the complete picture, check out our full 2026 SEO roadmap for blogs.
- Verify a Domain Property: Add a DNS TXT record at your registrar or CDN level (Cloudflare) to cover all protocol variations.
- Submit Your XML Sitemap: Use AIOSEO to generate your sitemap index and submit sitemap.xml under the Sitemaps tab.
- Run a Baseline Live Test: Paste your homepage URL into the URL Inspection Tool, click TEST LIVE URL, and confirm that Googlebot can fetch and render your site without errors.
- Schedule Your First Monthly Audit: Set a calendar reminder 30 days from today to execute the low-hanging fruit keyword optimization routine on your page 2 queries.
DGSoftHub — Learn. Implement. Grow Online. Build clear content, use Search Console to remove technical friction, and let the traffic compound over time.